We strictly abide by the guidelines and principles published by the College of American Pathologist for processing and reading the prostate biopsies and WHO Genitourinary Pathology Committee for interpreting the bladder biopsies.
A recent article elegantly outlines the principles and the impact of quality laboratory work. The abstract and the source of the article are presented below:
“The reported detection rate of prostate cancer, lesions suspicious for cancer, and prostatic intraepithelial neoplasia (PIN) in needle biopsies is highly variable. In part, technical factors, including the quality of the biopsies, the tissue processing, and histopathological reporting, may account for these differences. It has been thought that standardisation of tissue processing might reduce the observed variations in detection rate. Consensus among the members of the pathology committee of the European Randomised study of Screening for Prostate Cancer (ERSPC) concerning the optimal methodology of tissue embedding resulting in guidelines for prostatic needle biopsy processing was reached. The adoption of an unequivocal and uniform way of reporting lesions encountered in prostatic needle biopsies is considered helpful for decision taking by the clinician. The definition of parameters for quality control of prostatic needle biopsy diagnostics will further facilitate clinical epidemiological multicentre studies of prostate cancer.”
*Journal of Clinical Pathology on 4 October 2006. To read the full Article click HERE.
Here is how we do it:
To excel at histotechnology, we start the procedure at the urologist office:
- We ask the urologist to use Eosin to stain the core so that all the pieces no matter how minute appear easily in the formalin bottle
- The technician uses magnifying glass and a strong light source to isolate the cores and the pieces to make sure only formalin is left in the bottle and also check the lid before disposing the bottle.
- We use two sponges and a black paper to place the cores into the cassettes so that they do not get lost in the processor.
- The technician is able to see all the pieces on the black paper during embedding. We stretch them, place them in parallel and flatten them with a special chuck so that they are placed in one plane of section. See what happens if we do not do that for Fig 4 and Fig 5.
- We obtain a long ribbon. All the sections in that ribbon are used to make slides 1, 2,3 and 4, like a cinematographic presentation of the lesion at multiple levels. 1st and 3rd slides are stained with H&E. The slides 2 and 4 are used for possible immunostaining. If you attempt to cut new sections from the block, 90 percent of the time the glands in question will not be there, trimmed away. (Fig. 1, Fig 2)
- The requisition serial number is written on all records, blocks slides and the report. The cassettes and the slides of the same case are always one color. Different colors of slides and cassettes are used in consecutive cases so that no mismatch occurs.
- The ribbon is placed on the water bath to spread the sections. If the water surface is not wiped off after every case, a tiny piece from one case will float in the other case’s slide. The most common of all the errors!
A reliable histotechnology processing of a single case takes almost 5 hours from opening the box to issuing the report. After having worked in big labs, I recognized that the histotechnology matters most even if the pathologist provides the best diagnosis in the world. I opened my laboratory so that I could supervise the quality of the histotechnology work that have to match my experience in uropathology.
- The benefits of cutting a ribbon and making the slides from that ribbon:

Figure 1
At 4x, the arrow shows the tumor glands. If the serial sections were not obtained, that focus would not possibly exist in the next level. Again, if you do not cut the sections in advance, (we make 4 slides, each containing 2-3 sections), it is almost impossible to examine such a focus in the new sections from the paraffin block.
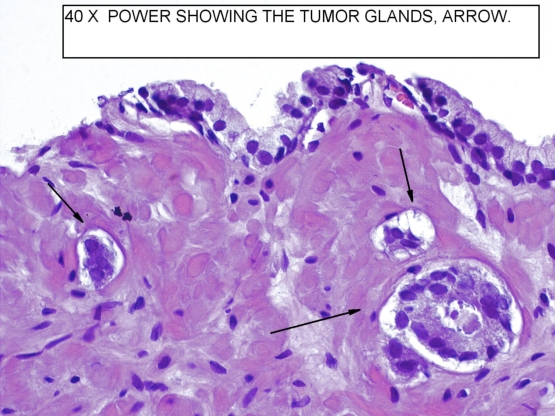
Figure 2
40x power shows tyhe tumor glands with characteristic features of malignancy. The diagnosis was also confimed with immunostaining.
- Quality of immunostaining:
Immunostaining with cocktail staining shows that the tumor glands are positive for racemes, pointed by arrows as granular cytoplasmic staining. By comparison, the adjacent benign glands show basal nuclear homogenous brown staining, indicating the presence of basal cells. The marker is p63, which is a nuclear basal cell marker. The tumor glands lack this basal cell staining.
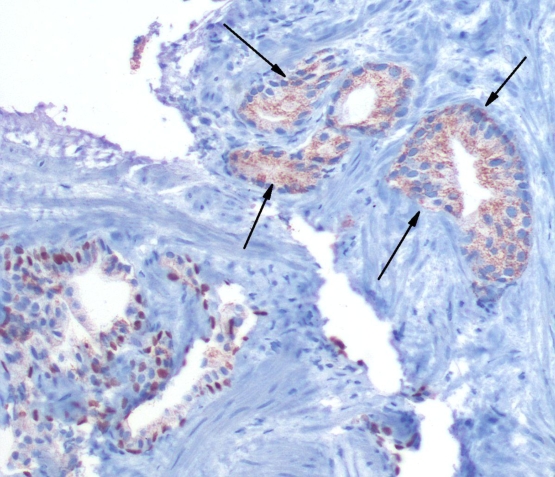
Figure 3
- The impact of embedding, putting too many cores in one vial and leveling the cores:
The following two slides show what can happen if embedding is not done right.
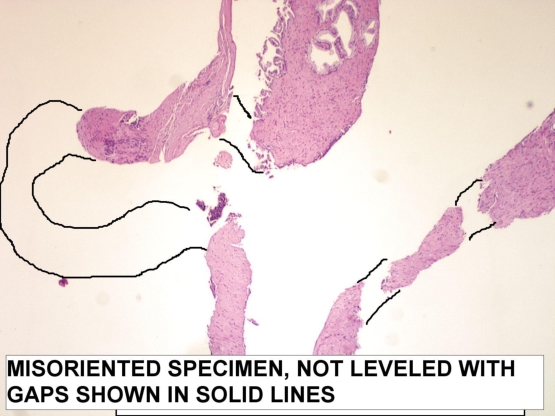
Figure 4
The specimen is not embedded right. The cores are not leveled on surface. The section cannot go through the entire length and the gaps appear as outlined.
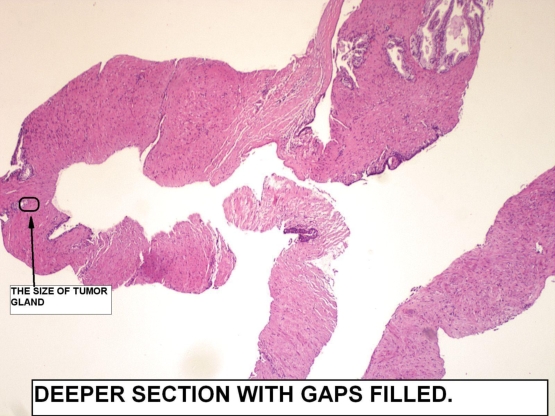
Figure 5
Therefore I ordered levels. The levels showed that the gaps filled up. The tumor found was pointed in the small circled area. This case truly displays what can happen when embedding is done poorly. This is especially a big problem if too many cores are submitted in one vial or the cores get fragmented during processing or transportation.